Online Editing: The Art of Screen Replacements
- Tim Love

- Jul 7, 2025
- 4 min read
One of the most common and incredibly satisfying tasks I perform in online editing is screen replacement. You see it everywhere – from a character looking at a phone in a commercial to a futuristic dashboard in a sci-fi film. But a lot of the time, you wouldn't even notice that they've occurred. Let's pull back the curtain and explore the magic behind screen replacements and why we do them.

Why Do We Replace Screens?
You might think, "Why not just record their phones during filming?" That's a great question, and sometimes, for very simple shots, they might. Here's a few reasons why we do it.
Flexibility and Last-Minute Changes: Production schedules are tight, and creative decisions can evolve right up until the final moments. By shooting with a blank screen and markers, directors and clients have the flexibility to finalise the screen content much later in the process. Imagine shooting a commercial with a specific app on a phone, only for the app's UI to change before release! Screen replacement saves the day.
Lighting and Reflections: Real screens emit light and are highly reflective. This can cause unwanted glare, reflections of the crew, or inconsistent lighting on the talent's face. Shooting with a non-reflective surface or a simple green/blue screen allows for much greater control over lighting and prevents distracting reflections.
Creative Control: Screen replacement opens up a world of creative possibilities. We can insert animated graphics, complex user interfaces, futuristic displays, or even entire video sequences that wouldn't be practical or possible to display live on set. Importantly, Online Editors or VFX Editors can control the timing of the assets, so that notification will appear at the exact moment the edit needs it to.
How Are They Shot? A good track is the foundation
The key to a successful screen replacement lies in the on-set preparation. There are two primary methods:
Tracking Markers: This is arguably the most common and often preferred method. The actual screen on the device (phone, tablet, TV, etc.) will either be turned off or covered with a plain, non-reflective surface that has distinct tracking markers placed on it. These markers are typically small, high-contrast crosses or dots that give us editors, crucial points of reference to track the movement, rotation, and perspective of the screen in 3D space. This allows us to perfectly "pin" the new content to the moving screen. Lovebug Films frequently leverages advanced motion tracking tools like Mocha Pro's Planar Tracking and Nuke. A great advantage of this method is that if we use a black screen on a phone with white tracking markers, we achieve a high contrast ratio making the tracking more reliable. This approach can also preserve reflections and glass textures when compositing later on.
Green or Blue Screen: A green or blue screen background can be used with tracking markers. This provides a clean, uniform colour that can be easily "keyed" out in post-production, leaving a transparent area where the new screen content can be composited in. This method is particularly useful if there are complex foreground elements passing in front of the screen and can be beneficial for avoiding roto work. Continuing with the phone example, these foreground elements might be thumbs tapping or swiping.
How Screen Replacements Are Done in Post
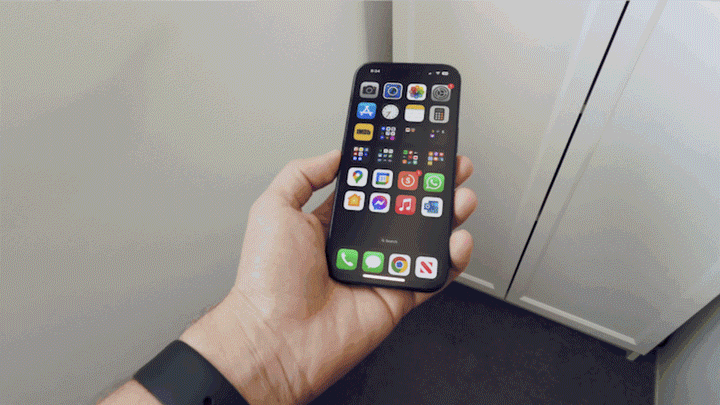
Let's take a look at this simple example in the Lovebug Films edit suite. The camera is gently moving while the phone is also being rotated to catch the reflections of the light in the scene.
Here's a breakdown of the process in Nuke, after standard plate preparation:
Step 1: Tracking the Screen
The Tracker Node analyses the movement of our markers position, scale and rotation. Giving us precise data that can then be used to generate a match-move Node for Step 3 and then a Stabilise Node for Step 4.

Simple ellipse masks are tracked to the markers Step 2: Preparing the New Content
The digital content (app interface, video, graphic) is prepared. It's sized correctly and often pre-animated in tools like After Effects to fit the scene's context. In this case I'll be using a screenshot from my phone, often I’ll use the same dimensions of the screenshot for a perfect comp and perform my motion design within that.
Step 3: Removing Tracking Markers (Clean Plate)
Now the tracking markers are removed from the original footage. Nuke's Inpaint node is key here, intelligently filling areas by analysing surrounding pixels to preserve original colour and light, crucial for soft reflections. It can create a muddy look, so be on guard for errors. In this case (and particularly with green screen) it’s very useful and fast.

The markers have been painted out, preserving the lighting changes for compositing. Step 4: Match move the New Screen
Now that we have our clean plate, we can link our new content to the match-move data from Step 1, and it should precisely stick to the phone.
Step 5: Composite the New Screen
Meticulous adjustments are made to brightness, contrast, colour, and sometimes reflections of the new content. Because we used a black screen with white markers, we have preserved our reflections and can Multiply our new content onto the phone through the Merge node. The goal is to perfectly match the original scene's environment, adding glows or light wraps for absolute realism. Advanced techniques that can help sell the comp:
Motion Blur: Replicate original footage's blur on the new screen.
Partial Obstructions: Use rotoscoping (painstaking tracing) to keep objects like hands in front of the new screen.
Lighting Changes: Ensure the new screen reacts realistically to shifting light in the scene.
Lens and Camera Imperfections: Chromatic aberration, lens distortions, lens breathing, depth of field.
We have a solid composite, the original light reflections are interacting with our new content.
It can be pretty satisfying to see it all come together and it's easy to see how the process of screen replacement can be integral in the production pipeline. For a closer look at these techniques in real world action, you can see them employed across the Samsung Christmas Campaign Lovebug Films completed for CHEP.


Comments